It is always a big problem to gift inexpensive presents to newborn babies. Buying a gift can not only be very hectic and mind-bogglingly, but it can also be an expensive one. When you really want to gift something great but not too costly. And the ultimate choice for presenting a gift comes from How to Embroider a Onesie.
Onesies, on the other hand, is a difficult task when it comes to embroidering. For one thing, they’re difficult to hoop, and they’re frequently composed of delicate materials. Further, they are stretched throughout the stitching process.
We will share the process for using a single-needle embroidery machine to embroider a onesie today. There are not many considerations. All you have to do is get an idea for choosing the best stabilizer, patterns, designs, and onesie.
What is a Onesie?
Most parents require a onesie in their baby’s wardrobe. This is a simple undershirt that breaks below the bottom to make changing your diaper a breeze. Further, these onesies can be worn under anything. They can even wear this onesie in the summer season when the temperature is high.
Moreover, they are being used frequently because babies spit up a lot and poop a lot. Also, they are the most wearable dresses for babies during the summer season.
Supplies
Here is the list of the things you need to make a onesie:
- You’ll need an embroidery machine
- A Small hoop for the design
- Threads
- Stabilizer
- Needles
- Scissors
- Tender Backing
- Marking pen
Placement for embroidery
This is a perfect solution when it comes to embroidery. In this process, you need two things a hoop and a fabric marker. On the other hand, you need to place the grid on the fabric and make sure it falls in the center of the cloth. Further, use the marker and start marking, leaving an inch from the collar of the onesie.
Moreover, you make proper markings with the help of a marker in the empty place so that the dots appear on the shirt. It makes a massive difference to hoop straight and centered if you make these marks before you start.
Hoop less embroidering
Embroidering a classic bodysuit with snaps at the bottom might be a good option for you. You may find it almost impossible to embroider correctly without using a hoop. There are side-snap bodysuits, and they are a better option for those who dislike hooping but wish to embroider bodysuits.
The suit unzips at the side so you can embroider without removing the extra fabric from the back. Despite being more unconventional than standard onesie hooping, you might want to give these a try if you’re bored with standard hooping. In addition, when you don’t have to snap, hooping is highly recommended. You can either fasten the onesie in a number of different ways or leave it unfastened if you want it to float.
Onesies Size
Onesies for infants and newborns are adorable and petite. Still, embroidered onesies for preemies and newborns are not worth the trouble. Make little onesies more personalized by applying heat-transfer vinyl with a Cricut. Moreover, when hooping, a larger onesie will make the process easier, especially when the backcloth has to be pushed out of the way.
Some newborns aren’t so tiny that they can wear newborn clothing upon arrival. You can therefore get more wear out of a onesie if you choose a slightly larger size.
Designing
Rather than a dense design, choose a light one. A onesie cannot support dense patterns that affect a newborn’s sensitive skin or pucker. Avoid anything too large as well. For large designs, larger hoops are required, making removing excess material from underneath the hoop more challenging.
To stitch giant motifs, you may wish to consider buying an embroidery machine that comes with a free arm. An appliqued monogram is also trendy! You don’t know what family you are embroidering for. Consider patterns based on animal themes or character-based sayings.
How To Embroider A Onesie The Complete Process?
Here is the complete process for how to embroider a onesie that we have managed for you.
Preparations
Embroidering bodysuits should always be done before pre-washing. You might have to worry about shrinking when wearing cotton onesies. If you decide to wash these, use a non-chlorine bleach detergent.
The design has now been selected for the onesie. Divide the onesie into two halves and place the design in the center, center to center, across the whole onesie. Moreover, if you are using an embroidery program, you can print out a template and lay it on the onesie to see the vertical location. Another option is to use your intuition.
It is preferable to use long lines to keep the onesie in the hoop straight, rather than using simple marks to outline the area you want to embroider. To embroider a dark-colored onesie, use the chalk wheel.
Using Hoop
Start by ironing your stabilizer onto the back of the onesie. Make sure to turn the onesie inside out first so that you can iron it. Pressing instead of ironing reduces the chance of stretching the cloth by avoiding frequent back-and-forth movements. If you plan to use fabric markers, don’t iron them first, as some become permanent when heated.
You should choose the most miniature hoop for your design. Onesie is turned right side out by placing the bottom frame of the inside hoop on top of the onesie. And a large enough onesie does not matter from which direction the hoop is placed. Hopping the onesie out of the crotch or the neck section of the hoop sometimes makes it easier.
Removing Fabric From Bodysuit
An embroidered bodysuit is one of the most challenging things to do. And there are several ways to secure the surplus fabric and try them all to find the one that best suits your needs. This technique can be done using thread huggers or hair clips.
Setting up the machine
Once your embroidery arm is attached, you can stitch. Your onesie might become problematic if the sides are too mounding. Sometimes, it’s easier to simply roll the excess fabric away and place the hoop on the machine.
Afterward, cover everything with a water-soluble topping. Pins, tape, glue, or dabbing with water will work to attach it. By aligning your embroidery foot with the center of the marked area, you can set the machine to embroider. Make sure you use the correct needle, upper thread, and bobbin thread, and bend your pattern to fit the onesie’s orientation.
Embroidering
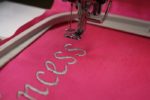
Watch the onesie begin to embroider once you click the start button! Keep an eye on onesies at all times. And the embroidery foot may get trapped occasionally, or a clip might come off. Moreover, if this happens, stay away from the machine! Avoid having to stop the machine by keeping fabrics out of the way.
FAQs
Can I embroider on baby clothes?
Your affection for the new family member can be expressed through embroidery on baby clothes. With the hooping, stabilizer, and more tips, you can master embroidering on onesies. Soft and stretchy cotton is used for onesies, and the onesie should be washed and dried to prevent shrinkage.
What can I embroider for a baby?
There is a lot of things that you can embroider for babies. The list includes:
Baby Bibs
Burp Cloths
Onesies
Sleepers
Sleepsacks
Baby Blanket
Quilt
Diaper Bag
Bottle Bags
What is backing for embroidery?
We meet and exceed these standards with our embroidery backing. Most embroiderers who use durable fabrics choose a tearaway backing. The tearaway material saves time, money, and safety over permissions that must be cut with scissors.
Why do you need a stabilizer for embroidery?
Machine embroidery requires a stabilizer. Stitching is done using it because it prevents the fabric from puckering or stretching during the stitching process. Stabilizers are an essential choice for embroidery projects.
How do you apply cloud cover over embroidery?
The Cloud Cover Stitch should be used along with a stabilizer to embroider the garment. Tearaway thread may be acceptable. And you can cover scratchy stitches on the reverse side with Cloud Cover Stitch after the embroidery has been completed.
Conclusion
In the conclusion section, we would like to conclude that you have a clear and perfect idea of How To Embroider A Onesie for babies. Some think that it is an impossible task to perform at home, and here is the perfect guide for revisiting their thinking for all those who believe in the same way.
From now on, no one will be able to say that embroidering a onesie is an impossible task to perform at home. And with the help of this ultimate guide, you can have the perfect-looking onesie for your loved ones within no time.


